1. Overview
This project is heavily inspired by CIDER, and the goal of this project is to provide a Clojure development environment to Vim that is comparable(or more) to CIDER.
The assumption of "comparable to CIDER" varies from person to person. Although it is subjective, I assume "comparable to CIDER" is that there is no obstacle to development at work.
2. Getting Started
2.1. Installation
vim-iced itself and vim-sexp are the minimal requirements.
In addition, if there is one of follows, you can use interactive UI for selecting one from multiple candidates (e.g. selecting a ns which you’d like to add)
If anything is okay, ctrlp.vim is easy to install and stable.
2.1.1. Installing plugins
At first, if you don’t have a plugin manager, please install vim-plug.
$ curl -fLo ~/.vim/autoload/plug.vim --create-dirs \
https://raw.githubusercontent.com/junegunn/vim-plug/master/plug.vim$ curl -fLo ~/.local/share/nvim/site/autoload/plug.vim --create-dirs \
https://raw.githubusercontent.com/junegunn/vim-plug/master/plug.vimNext, add a vim-plug section to your ~/.vimrc (or ~/.config/nvim/init.vim for Neovim)
" Specify a directory for plugins
call plug#begin('~/.vim/plugged')

" One of following
Plug 'ctrlpvim/ctrlp.vim'
Plug 'junegunn/fzf'
Plug 'liuchengxu/vim-clap'

" Requires
Plug 'guns/vim-sexp',    {'for': 'clojure'}
Plug 'liquidz/vim-iced', {'for': 'clojure'}

call plug#end()

" Enable vim-iced's default key mapping
" This is recommended for newbies
let g:iced_enable_default_key_mappings = v:true
Then start Vim/Neovim, and execute the following command to install dependent plugins.
:PlugInstall2.1.2. iced command
iced is a a utility command to make you easy to use vim-iced, and it comes with vim-iced.
Setup is easy, just add the bin directory under the installed vim-iced directory to $PATH environmental variable.
With above vim-plug setting, ~/.vim/plugged/vim-iced/bin is the directory to add to $PATH.
# For bash or zsh
$ export PATH=$PATH:~/.vim/plugged/vim-iced/bin

# For fish
$ set -x PATH ~/.vim/plugged/vim-iced/bin $PATH
To confirm setup, run the following command.
$ iced versionSee iced command for more information.
2.2. Quick start
Let’s create a sample project for quick start. Here Leiningen is used to create a project template.
$ lein new hello-iced
$ cd hello-iced
We use iced command to launch REPL instead of lein command.
This allows iced command to take care of all the additional libraries and REPL settings you need.
$ iced replOpen vim and execute IcedConnect command.
$ vim src/hello_iced/core.cljYou succeeded to connect REPL if you see "Connected" message, so let’s execute the next command.
:IcedEval (+ 1 2 3 4 5)Do you see 15 as a result?
If so, your vim has started working with Clojure’s REPL finally!
3. Evaluation
The evaluation of S-expression is the most important element in REPL driven development.
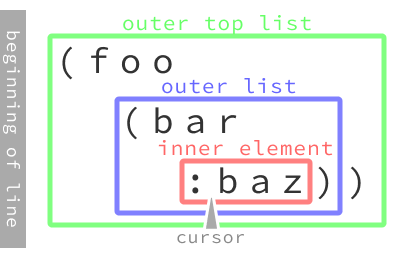
3.1. Ranges
There are 3 main ranges to evaluation in vim-iced.
-
inner element
-
outer list
-
outer top list
See the following figure for the concrete ranges.
If you enable default key mappings, following key mappings are available.
inner element |
|
outer list |
|
outer top list |
|
See help file for other default key mappings.
| See also Eval inside comment |
3.2. Results
The evaluation result is echoed on command-line and displayed in a popup at the end of line.
However, the displayed result is only the returned value, so for example, the contents output by println are not displayed.
The contents output to standard output are displayed on the Stdout buffer.
The highlight setting for popup can be modified by g:iced#eval#popup_highlight.
3.3. Marks
vim-iced also provides ways to evaluate forms by Vim’s mark. This feature is implemented by Conjure originally.
| Command | Default key mapping | Description | ||
|---|---|---|---|---|
<Leader>ea |
Evaluate the outer list (not outer top list) on the specified mark.
|
|||
<Leader>el |
Re-evaluate the outer top list which is evaluated last. |
For example, when you have a mark m on any position, <Leader>eam will evaluate the outer list on the mark m from any position.
3.4. Yank
The evaluated result is yanked to numbered registers. Like vim’s behavior, iced shifts the previous result of register 1 into register 2, 2 into 3, and so forth.
If you have values you don’t want to store, See g:iced#eval#values_to_skip_storing_register.
When you specify a register like yank,
<Plug>(iced_eval) operator will yank the result.
E.g. "x<Leader>ee will yank a result to register x.
Yanking to " register is skipped for now.
|
If you’d like to define a custom mapping, try below.
" mapping for "xee
nmap <silent> ee <Plug>(iced_eval)<Plug>(sexp_outer_list)``
3.5. Context
There are times when you want to evaluate the contents of a function for confirmation.
(defn greet [s]
  ;; We'd like to evaluate the following code!
  (str "hello " s))
It is tired to bind arguments separately, or to write function calls in the comment form every time.
(comment (def s "iced"))
;; or
(comment (greet "iced"))
This is where evaluating codes in context help you. There is a default key bindings to evaluate code in a context.
outer list |
|
With this mapping, the context input will be required.
The context is clojure.core/let style.
For example, the context s "iced" will be expanded to the following code.
(clojure.core/let [s "iced"]
  (str "hello " s))
See <Plug>(iced_eval_in_context) for more information.
Unresolved directive in evaluation.adoc - include::evaluation/spinner.adoc[]
4. Completion
4.1. Omni completion
vim-iced provides only omni completion.
It is set to omnifunc for clojure filetype automatically by default.
Vim has a <C-x><C-o> key mapping for omni completion.
(prin📍) ;; Type `<C-x><C-o>` to show omni completion4.2. Auto completion
vim-iced itself does not provide any auto completion methods.
However, the following completion plugins are supported as external plugins.
4.2.1. asyncomplete.vim
asyncomplete.vim is a async completion plugin in pure vim script for Vim8 and Neovim, and vim-iced-asyncomplete is a vim-iced plugin to work with this plugin.
To use vim-iced-asyncomplete, add followings to vim-plug section in your ~/.vimrc (or ~/.config/nvim/init.vim for Neovim)
Plug 'prabirshrestha/asyncomplete.vim'
Plug 'liquidz/vim-iced', {'for': 'clojure'}
Plug 'liquidz/vim-iced-asyncomplete', {'for': 'clojure'}
4.2.2. coc.nvim
coc.nvim is a intellisense engine for Vim8 and Neovim, and vim-iced-coc-source is a vim-iced plugin to work this plugin.
To use vim-iced-coc-source, do following installation steps.
-
Install coc.nvim (here is the installation step)
-
Add followings to
vim-plugsection in your~/.vimrc(or~/.config/nvim/init.vimfor Neovim)
Plug 'liquidz/vim-iced', {'for': 'clojure'}
Plug 'liquidz/vim-iced-coc-source', {'for': 'clojure'}
-
Add the following definition to your
coc-settings.json
{
    "coc.source.iced.enable": true
}
5. Reference
5.1. Docstring
There are two ways (explicit and implicit) to refer to a var’s docstring.
The explicit way is to execute one of the following commands.
| Command | Default key mapping | Description |
|---|---|---|
K |
Shows the docstring for the var under the cursor in a popup window. |
|
Opens a Document buffer, and shows the docstring in it. |
The implicit way is the Auto Document feature. This feature will automatically display a one-line documentation string on the right of cursor line. This will be done by CursorMoved / CursorMovedI auto command and timer.
-
g:iced_enable_auto_document: Enable auto document feature.
-
g:iced#nrepl#auto#document_delay: Define delay time for displaying auto document.
5.2. ClojureDocs
ClojureDocs is a community-powered documentation and examples repository for the Clojure programming language. Vim-iced can display ClojureDocs reference information for a provided search term or the symbol under the cursor. It opens a temporary window split which can be closed with IcedDocumentClose.
| Command | Default key mapping | Description |
|---|---|---|
<Leader>hc |
Open a window, and show documents for the symbol under the cursor. |
|
|
5.2.1. ClojureDocs on ClojureScript
ClojureDocs does not have docs for ClojureScript currently.
But if you would like to use Clojure documentation instead of ClojureScript, you can use it by enabling g:iced#clojuredocs#use_clj_docs_on_cljs.
5.3. Source code
IcedSourceShow or IcedSourcePopupShow is useful when you would like to refer to the source code itself. The keyboard shortcuts will show the source code for the symbol under the cursor, the commands can be used to search for the source code of any symbol that’s provided.
| Command | Default key mapping | Description |
|---|---|---|
<Leader>hs |
Shows the source code in a popup window. |
|
<Leader>hS |
Opens a separate buffer(Document buffer) and shows the source code in it. |
5.3.1. Enhanced source extraction
If g:iced_enable_enhanced_definition_extraction is true, vim-iced enable enhanced source extraction. This feature is enabled by default.
The difference from normal extraction is to extract source by not only def and defn but also let form.
|
borkdude/jet is required currently. |
5.4. Use cases
Sometimes, it is useful to know how a function is used elsewhere. IcedUseCaseOpen command is for that.
IcedUseCaseOpen will open a separated buffer, and show the first usecase if it is found.
When there are several usecases, IcedNextUseCase and IcedPrevUseCase commands switch the shown usecase.
5.5. clojure.spec
vim-iced provides following commands to integrate with clojure.spec.
| Command | Default key mapping | Description |
|---|---|---|
<Leader>bs |
Browse specs, and show spec form in Document buffer. |
|
Open a Document buffer, and show the spec form for specified keyword. |
||
Open a Document buffer, and show the example of the spec. |
||
<Leader>ts |
See Checking spec for more information |
5.6. Javadoc
vim-iced provides following commands to integrate with clojure.java.javadoc.
| Command | Description |
|---|---|
Opens a browser window displaying the javadoc for a |
6. Navigation
6.1. Jump to definition
vim-iced provides IcedDefJump command for jumping to definition.
It supports jumping to
-
qualified keywords
-
local vars
-
protocol implementations (requires clj-kondo v2022.02.09 or later)
Can also specify using split window, tab, or other ways to open target location.
If you jumped to a definition with above command, vim-iced add the current cursor position to Vim’s tag stack. So you can go back easily with <C-t>.
See also:
6.2. Other navigations
6.2.1. Source and test
IcedCycleSrcAndTest will cycle source file and test file for current namespace.
For example, when you are in foo.core, IcedCycleSrcAndTest command will open the file which has foo.core-test namespace.
If there is no corresponding file, vim-iced suggests pseudo file path to create new namespace.
6.2.2. Cross reference
To browse positions referencing/depending on the form under cursor, following commands are useful.
| Command | Default key mapping |
|---|---|
<Leader>br |
|
<Leader>bd |
6.2.3. Related namespaces
Such as foo.handler.home and foo.view.home, there are likely to have related namespaces in web applications.
IcedBrowseRelatedNamespace is useful to jump in these related namespaces.
6.2.4. Test cases
Sometimes you may want to jump to the test code that corresponds to a specific var.
IcedBrowseTestUnderCursor command will search test functions that contains the var name in its test name.
6.2.5. let form
IcedJumpToLet allows you to jump cursor to the nearest let form.
If let form is not found in current top list, cursor is not moved.
Default key is mapped to <Leader>jl.
7. Macro
Expanding macro is important for writing/debugging macros. vim-iced provides following two commands.
| Command | Default key mapping |
|---|---|
<Leader>em |
|
<Leader>eM |
These commands will open a separated buffer, and show expanded result in it.
IcedMacroExpand1OuterList will show the result of expanding once, while IcedMacroExpandOuterList will show the all expanded result.
7.1. Expand expanded macro
As you know, IcedMacroExpand1OuterList will show the result of expanding once.
In the separated buffer for expanding macro, you can use IcedMacroExpand1OuterList command and its <Leader>em key mapping again.
This means you can expand the expanded macro additionally.
8. Testing
vim-iced can integrate with clojure.test, and provides following test commands.
| Command | Default key mapping | Description |
|---|---|---|
<Leader>tp |
Run all tests in current project |
|
<Leader>tn |
Run tests in current namespace |
|
|
Run a test under cursor |
|
|
Re run failed tests |
|
|
Run the last test again |
8.1. Test result
When tests are failed, vim-iced show error messages in Test buffer, and IcedTestBufferOpen command open the buffer.
8.2. Related tests
IcedTestUnderCursor is not just running a test under cursor.
If the var under cursor does not contain :test metadata and current namespace doesn’t end with "-test",
vim-iced searches test vars in corresponding test namespace (c.f. Source and test) and run them.
Target test vars should include original var name in its name.
8.3. Checking spec
There is also checking spec as one of the tests.
IcedTestSpecCheck command is useful to run clojure.spec.test.alpha/check for the function under cursor.
|
Adding test.check dependency is required. |
You can specify the number of tests as a command argument, or g:iced#test#spec_num_tests variable.
8.4. Testing on plain nREPL
|
borkdude/jet is required currently. |
vim-iced basically requires nREPL with some middlewares. But in some case, you may need to use plain nREPL such as babashka.nrepl.
In this case, vim-iced provides simple test integration which has less functionality than cider-nrepl’s one.
To use this simple test integration, you don’t need to recognize whether your nREPL is plain or not. Following commands are also support simple test integration, so you just execute these commands as usual.
|
|
9. Formatting
vim-iced’s code formatting is powered by cljfmt. vim-iced proivdes the following two commands to format code.
| Command | Default key mapping | Description |
|---|---|---|
== |
Reformat current form. |
|
=G |
Reformat current buffer. |
vim-sexp also provides a code formatting function.
If you want to use vim-iced’s formatting function, you should define g:sexp_mappings as follows.
let g:sexp_mappings = {'sexp_indent': '', 'sexp_indent_top': ''}| See also Customizing indent rules |
9.1. Format on writing files
vim-iced also provides following sync commands.
These commands are useful for formatting on writing files. For example, add this to your confirguration to format the current file on write.
aug VimIcedAutoFormatOnWriting
  au!
  " Format whole buffer on writing files
  au BufWritePre *.clj,*.cljs,*.cljc,*.edn execute ':IcedFormatSyncAll'
aug END
Add this to your confirguration to format the current form on write.
aug VimIcedAutoFormatOnWriting
  au!
  " Format only current form on writing files
  au BufWritePre *.clj,*.cljs,*.cljc,*.edn execute ':IcedFormatSync'
aug END
9.2. Customize formatter
vim-iced also supports following (GraalVM powered) code formatting tools.
If you change g:iced_formatter option, vim-iced will use the tool to format code and calculate indent level.
|
These tools can be downloaded automatically if you want. |
9.3. Auto indenting
vim-iced provides auto indentation, enabled by default.
The indent level is calculated by the set formatter,
so cljfmt formatter which is used by default may lead slow down vim/nvim.
If you don’t use vim-iced’s auto indentation, you can disable it through the g:iced_enable_auto_indent variable.
let g:iced_enable_auto_indent = v:false10. Debugging
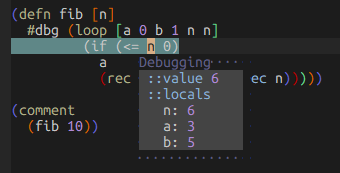
vim-iced supports CIDER’s #dbg and #break reader literals.
The easiest way is to put #dbg to your code, and evaluate it.
(defn fib [n]
  #dbg (loop [a 0 b 1 n n]
         (if (<= n 0)
           a
           (recur b (+ a b) (dec n)))))
Once you evaluate (fib 10), debugger will launched something like follows.
10.1. Tracing function calls
vim-iced provides 2 commands for tracing function calls.
| Command | Description |
|---|---|
Toggle tracing the specified var in current namespace. |
|
Toggle tracing the specified namespace. |
Traced result will be displayed in Stdout buffer.
10.2. Browsing tapped values
If you have a big data structure and want to dig into it, browsing tapped values is useful.
When you evaluate (tap> YOUR_DATA), IcedBrowseTapped shows tapped values.
Select the value you want to dig into, then browsing value start.
To use tap>, Clojure 1.10.0 or later is required.
|
All tapped values are stored in memory. So if you would like to delete them, execute IcedClearTapped command.
10.2.1. Browsing keys
For example, when there are following tapped values:
-
1st tapped value:
{:foo [{:dummy "bar"} {:bar "baz"}]} -
2nd tapped value:
{:hello "world"}
The key to browse "baz" is 0 :foo 1 :bar.
-
The first
0means "browse 1st tapped value" -
:fooand:barmeans the key for hash-map -
1means the index of list/vector Back to top
11. Refactoring
11.1. Namespace
Following commands are available.
| Command | Default key mapping | Description |
|---|---|---|
<Leader>rcn |
Cleanup ns form. |
|
<Leader>ran |
Add require to |
|
<Leader>ram |
Add missing libspec. |
If you don’t want to place a newline after the :require and :import tokens with IcedCleanNs command,
Please see g:iced#refactor#insert_newline_after_require option.
11.1.1. Cache
Namespaces and its aliases are cached for performance. IcedClearNsCache will clear this cache.
11.2. Function
Following commands are available.
| Command | Default key mapping | Description |
|---|---|---|
<Leader>ref |
Extract the form under cursor as a function. |
|
<Leader>raa |
Add an arity to |
11.2.1. Examples
;; before
(defn foo [x]
  (inc (📍* x 2)))

;; after
(defn- bar [x]
  (* x 2))

(defn foo [x]
(inc (bar x)));; before
(defn foo [x]
(📍inc x))
;; after
(defn foo
([])
([x]
(inc x)))11.3. Form
Following commands are available.
| Command | Default key mapping | Description |
|---|---|---|
<Leader>rtf |
Convert current outer form to use |
|
<Leader>rtl |
Convert current outer form to use |
|
<Leader>rml |
Move the form under cursor to nearest |
11.3.1. Examples
;; before
(foo (bar (baz "hello")))
;; after
(-> "hello" baz bar foo);; before
(foo yy (bar xx "hello"))
;; after
(->> "hello" (bar xx) (foo yy));; before
(let [foo 1]
(📍inc foo))
;; after
(let [foo 1
bar (inc foo)]
bar)11.4. Symbol
Following commands are available.
| Command | Default key mapping | Description |
|---|---|---|
<Leader>rrs |
Rename all occurrences of the symbol under cursor. |
11.4.1. Examples
;; before
(defn foo [x]
  (inc (* x 2)))

(def usage
  {:value (📍foo 21})

;; after
(defn bar [x]
  (inc (* x 2)))

(def usage
{:value (bar 21})12. Static analysis
Currently vim-iced supports static analysis by clj-kondo.
12.1. clj-kondo
This feature is disabled by default.
To enable, set v:true to g:iced_enable_clj_kondo_analysis.
Analysis process is run at BufWritePost autocmd. Analyzed data is cached at g:iced_cache_directory, and used in followings:
12.1.1. Local analysis
From clj-kondo v2021.01.20, local analysis is supported. It can be used to support jumping to local vars.
This feature is disabled by default.
To enable, set v:true to g:iced_enable_clj_kondo_local_analysis.
12.1.2. Tips
Cached files will be separated to var definition/usage and ns definition/usage automatically if you have jq or jet.
This leads to make IcedAddMissing and IcedAddNs more faster.
13. iced command
vim-iced provides iced command to use vim-iced easily.
Main purpose of this command is launching REPL with all features for vim-iced.
13.1. Supports
iced command currently supports following tools.
-
shadow-cljs — See also shadow-cljs section.
|
The When multiple projects are found, the priority is given in the order listed above. If you want to specify project type, use |
13.2. Usage
$ iced repl [options]13.2.1. Options
Following options are specially treated by iced command.
| Option | Description | ||
|---|---|---|---|
|
Enables ClojureScript features.
|
||
|
Enables features for testing with kaocha. |
||
|
Force to use Boot. |
||
|
Force to use Clojure CLI. |
||
|
Force to use shadow-cljs. |
||
|
Adds extra dependency. |
||
|
Adds extra nrepl middleware. |
||
|
Launch instant REPL via Clojure CLI. |
Other options are passed to each program as below.
13.2.2. Arguments
$ iced repl with-profile +foo$ iced repl -A:foo$ iced repl --with-cljs --force-clojure-cli -A:foo13.3. Advanced
13.3.1. Clojure CLI project
iced command use clj command for Clojure CLI project by default.
If you would like to use clojure command instead, you can overwrite the command by ICED_REPL_CLOJURE_CLI_CMD environmental variable.
$ ICED_REPL_CLOJURE_CLI_CMD=clojure iced replFor example, this is useful when you’d like to use rebel-readline in the REPL which is started by iced repl.
14. ClojureScript
vim-iced supports following environments currently.
-
Figwheel main — 0.2.0 or later is required.
vim-iced provides following commands for ClojureScript.
| Command | Description |
|---|---|
Start CLJS REPL with specified environment. |
|
Quit CLJS REPL. |
|
Cycle clj/cljs session. |
|
Start CLJS REPL via user specified code. |
14.1. Figwheel-main
To start CLJS REPL with Figwheel main, you need to specify build-id.
:IcedCljsRepl (figwheel.main.api/repl-env "build-id"):IcedStartCljsRepl figwheel-main build-id14.2. shadow-cljs
To start CLJS REPL with shadow-cljs, you need following steps.
|
|
-
Start to watch
-
$ iced repl {YOUR-BUILD-ID}-
In this case,
icedcommand will start watching project instead of starting REPL. -
You need a nREPL configuration file to start watching, but
icedcommand can generate it automatically.
-
-
-
Access shadow-cljs’s HTTP server in your browser
-
Connect to nREPL
-
Execute IcedConnect command to connect to REPL
-
For shadow-cljs, cljs-repl will be started automatically after connection.
-
You don’t need to specify your build ID anymore.
-
-
If you would like to start CLJS REPL by hand, you can do it as follows.
:IcedEvalRepl (shadow.cljs.devtools.api/repl :YOUR-BUILD-ID)15. Skeleton
vim-iced provides code skeleton when you open new clojure files. Concretely "when you open new" means the time when BufNewFile autocmd is fired.
Currently, following extensions are supported.
-
*.clj -
*.cljs -
*.cljc
15.1. Source file
For example, the skeleton when you open src/foo/bar.clj is as follows.
(ns foo.bar)15.2. Test file
A skeleton for test file depends on the file extension.
15.2.1. *.clj
For example, the skeleton when you open test/foo/bar_test.clj is as follows.
(ns foo.bar-test
  (:require [clojure.test :as t]
            [foo.bar :as sut]))
15.2.2. *.cljs
For example, the skeleton when you open test/foo/bar_test.cljs is as follows.
(ns foo.bar-test
  (:require [cljs.test :as t :include-macros true]
            [foo.bar :as sut]))
15.2.3. *.cljc
For example, the skeleton when you open test/foo/bar_test.cljc is as follows.
(ns foo.bar-test
  (:require #?@(:clj  [[clojure.test :as t]
                       [foo.bar :as sut]]
                :cljs [[cljs.test :as t :include-macros true]
[foo.bar :as sut]])))16. Operator
vim-iced provides following operators.
| Operator | Description |
|---|---|
Evaluate codes |
|
Evaluate code and print result to stdout buffer |
|
Evaluate code and tap result by |
|
Evaluate code and replace it by the evaluation result |
|
Evaluate code and add the result as a comment in current end of line |
It is useful to combinate these operators with vim-sexp's motions like follows. (Change the mapping key as you like)
aug MyClojureSetting
  au!
  au FileType clojure nmap <buffer> <Leader>epe
      \ <Plug>(iced_eval_and_print)<Plug>(sexp_outer_list)``
  au FileType clojure nmap <buffer> <Leader>ept
      \ <Plug>(iced_eval_and_print)<Plug>(sexp_outer_top_list)``

  au FileType clojure nmap <buffer> <Leader>eae
      \ <Plug>(iced_eval_and_tap)<Plug>(sexp_outer_list)``
  au FileType clojure nmap <buffer> <Leader>eat
      \ <Plug>(iced_eval_and_tap)<Plug>(sexp_outer_top_list)``

  au FileType clojure nmap <buffer> <Leader>ere
      \ <Plug>(iced_eval_and_replace)<Plug>(sexp_outer_list)``
  au FileType clojure nmap <buffer> <Leader>ert
      \ <Plug>(iced_eval_and_replace)<Plug>(sexp_outer_top_list)``

  au FileType clojure nmap <buffer> <Leader>ece
      \ <Plug>(iced_eval_and_comment)<Plug>(sexp_outer_list)``
  au FileType clojure nmap <buffer> <Leader>ect
      \ <Plug>(iced_eval_and_comment)<Plug>(sexp_outer_top_list)``
aug END17. Editing S-expression
vim-iced is depending on vim-sexp, and most features for editing S-expression are provided by vim-sexp.
In vim-iced, only the following functionalities which is extended from vim-sexp are provided.
| Command | Description |
|---|---|
Slurp the next element. |
|
Barf the last element in current form. |
|
These commands are so useful when combined with vim-submode. |
18. Docker
When you are connecting to nREPL in docker container, various paths will be paths in the docker container.
Because some features such as jumping to definition does not work properly as it is, vim-iced provides g:iced#nrepl#path_translation option to translate these paths.
See Docker in Configuration section.
18.1. Example
At first, build a simple docker image for vim-iced.
FROM clojure:openjdk-14-lein-alpine
RUN apk add --no-cache --virtual .builddeps git && \
    git clone --depth 1 --single-branch https://github.com/liquidz/vim-iced /usr/local/src/vim-iced && \
    apk del .builddeps
ENV PATH $PATH:/usr/local/src/vim-iced/bin
ENTRYPOINT ["iced", "repl"]
$ docker build -t vim-iced .Second, launch nREPL with a fixed port number.
(defproject foo "0.1.0-SNAPSHOT"
  ;; ...

  ;; Change port number as you like
  :repl-options {:host "0.0.0.0" :port 55555}

  ;; ...
  )
$ docker run --rm -it --expose 55555 -p 55555:55555 -v $(pwd):/tmp vim-icedFinally just connect with IcedConnect as usual.
19. Command palette
It is hard to remember all commands by vim-iced since there are many commands.
But most commands can be filtered/selected from the command palette even if you don’t remember them.
| Command | Default key mapping | Description |
|---|---|---|
<Leader>hh |
Select a command from the palette. |
If you’d like to customize the command palette(e.g. adding new command), g:iced#palette option is useful.
See Command palette in Configuration section for more information.
20. Buffer
20.1. Stdout buffer
When evaluating a form the output from Clojure’s standard output is sent to a dedicated buffer. Vim-iced provides the following commands to control it’s stdout buffer.
| Command | Default key mapping | Description |
|---|---|---|
<Leader>ss |
Open stdout buffer. |
|
<Leader>so |
Open stdout buffer. |
|
<Leader>sl |
Clear all lines in stdout buffer. |
|
<Leader>sq |
Close stdout buffer window. |
20.1.1. Notification
In addition to the stdout buffer, standard output can be displayed on popup notification when stdout buffer is invisible. If you don’t use notification for standard output, see g:iced#buffer#stdout#enable_notify option.
See also vim-iced-notification for more information.
20.1.2. Delimiters
It is useful to have a delimited line in the unit of output to limit the range of what you want to see.
See g:iced#buffer#stdout#enable_delimiter for more information.
20.2. Test buffer
Test results will be outputted to dedicated buffer.
vim-iced provides following commands to control test buffer.
| Command | Default key mapping | Description |
|---|---|---|
<Leader>to |
Open test result buffer. |
Test buffer is opened automatically when tests are failed. On the other hand, test buffer is closed automatically when test are succeeded.
So you don’t need to use the above command basically.
20.3. Document buffer
Documents will be shown to popup window by default. But you can show them to dedicated buffer to keep them displayed.
vim-iced provides following commands to control document buffer.
| Command | Default key mapping | Description |
|---|---|---|
<Leader>hb |
Open a window, and show documents for specified |
|
<Leader>hq |
Close document window. |
21. Configuration
21.1. Evaluation
21.1.1. Eval inside comment
comment form is useful during development for checking behavior.
You can use evaluating outer list range to evaluate codes inside comment form,
but it is cumbersome as some cursor movements are required.
IcedEvalOuterTopList helps by selecting different code to be evaluated when the current top form is a comment.
If the cursor is in a form nested inside the comment, the code to be evaluated will be the cursor’s topmost form in the comment, rather than the comment form itself.
When the cursor is otherwise at the same depth as the comment form itself, the comment will be evaluated as a do form.
This can be configured by g:iced#eval#inside_comment, and it is enabled by default.
(comment
  (print (📍str "hello"))   ;; Execute `:IcedEvalOuterTopList`
  (print (str "world")))    ;; => hello

(comment
📍(print (str "hello"))     ;; Execute `:IcedEvalOuterTopList`
  (print (str "world")))    ;; => helloworld
21.2. Formatting
21.2.1. Customizing indent rules
g:iced#format#rule is a configuration that allow you to define indentation rules for cljfmt.
For example, merr's let has a form like follows.
(merr/let +err+ [foo 1]
          (inc foo))
To format like clojure.core/let, you should define the following rule.
let g:iced#format#rule = {
      \ 'merr.core/let': '[[:block 2] [:inner 1]]',
      \ }
Then you can get the following result.
(merr/let +err+ [foo 1]
  (inc foo))
See cljfmt’s README for more information.
21.2.2. Tonsky’s formatting rule
If you’d like to use Tonsky’s formatting rule,
you can use this rule with cljfmt and cljstyle.
cljfmt
Set the following rule to g:iced#format#rule option.
let g:iced#format#rule = {'#"^\w"': '[[:inner 0]]'}cljstyle
Add following :indents setting to your .cljstyle.
{
 :indents ^:replace {#"^\w" [[:inner 0]]}
 }
21.2.3. Extra configuration for cljfmt
While g:iced#format#rule is a option for indentation rules,
g:iced#format#options is a option for cljfmt’s other configurations such as :remove-surrounding-whitespace?, :remove-trailing-whitespace? and so on.
let g:iced#format#options = {
      \ 'remove-consecutive-blank-lines?': v:false,
      \ 'remove-multiple-non-indenting-spaces?': v:true,
      \ }
See cljfmt’s README for more information.
21.3. Hook
Some events on vim-iced can be hooked, and you can execute any processing.
g:iced#hook is the definition. This is a dictionary with hook event as a key, and the value is a dictionary or a list of dictionaries.
let g:iced#hook = {
    \ 'connected': {'type': 'function',
    \               'exec': {_ -> iced#message#info_str('foo')}},
    \ 'disconnected': [{'type': 'command',
    \                   'exec': 'echom "bar"'}],
    \ 'ns_required': {'type': 'eval',
    \                 'exec': '(println "baz")'},
    \ 'test_finished': {'type': 'shell',
    \                   'exec': {v -> printf('tmux display-message "%s"', v.summary)}}
    \ }
Another way, you can also use iced#hook#add function to add definitions.
call iced#hook#add('disconnected', {
      \ 'type': 'command',
      \ 'exec': 'echom "hello"',
      \ })
21.3.1. Event
Following events can be hooked.
| Event key | Event parameters | Description |
|---|---|---|
connect_prepared |
|
Hooked before the start of connection. |
connecting |
|
Hooked just before connecting. |
connected |
- |
Hooked when vim-iced is connected to nREPL. |
disconnected |
- |
Hooked when vim-iced is disconnected from nREPL. |
test_finished |
|
Hooked when running test is finished. |
ns_required |
- |
Hooked when |
ns_all_reloaded |
- |
Hooked when |
session_switched |
|
Hooked when current session is switched. |
eval_prepared |
|
Hooked before the start of evaluation. |
evaluated |
|
Hooked after evaluation. The |
21.3.2. Reporter
Hooked events and event parameters are reported to reporters. You can define some kind of reporters as follows.
| Reporter key | Description |
|---|---|
shell |
Process a event by a shell command. |
eval |
Process a event by IcedEval command. |
function |
Process a event by a user-defined function. |
command |
Process a event by a vim command. |
21.4. Docker
g:iced#nrepl#path_translation is a option to define path translation rules.
In actual use, it is recommended to define the option in the project-specific configuration file by vim-localrc like follows.
let g:iced#nrepl#path_translation = {
      \ '/tmp': expand('<sfile>:p:h'),
      \ '/root': $HOME,
      \ }
21.5. Command palette
The g:iced#palette option allows you to customize the command palette.
In actual use, it is recommended to define the option in the project-specific configuration file by vim-localrc like follows.
let g:iced#palette = {
      \ 'foo bar': ':IcedEval (+ 1 2 3 4 5)',
      \ }
21.6. Advanced settings
21.6.1. Stdout buffer
| Option | Default value | Description |
|---|---|---|
|
Buffer position definition.
|
|
|
If not empty, vim-iced write stdout buffer content to the file path. |
|
|
Max line count to buffer for |
|
|
Max line count to keep in stdout buffer. |
|
|
Delay time for deleting excess lines in stdout buffer. |
21.6.2. Document
| Option | Default value | Description |
|---|---|---|
|
Buffer position definition.
|
|
|
Document window height. |
|
|
If |
| Option | Default value | Description |
|---|---|---|
|
Enable automatic displaying one-line document.
|
|
|
Display documents on popup window.
|
|
|
Max line distance to display one-line document. |
|
|
Delay time for displaying one-line document. |
21.6.3. ClojureScript
| Option | Default value | Description |
|---|---|---|
|
If |
|
|
If |
22. Tips
22.1. vim-submode
vim-submode is a Vim plugin to provide the way to define "submodes" to the built-in vim-modes.
vim-submode is useful to repeat some commands such as IcedSlurp or IcedBarf.
" Change key mappings as you like.
" In this case, type `<LocalLeader>kssss` to repeat slurping.
call submode#enter_with('slurp', 'n', '', '<LocalLeader>ks', ':<C-u>IcedSlurp<CR>')
call submode#enter_with('slurp', 'n', '', '<LocalLeader>kb', ':<C-u>IcedBarf<CR>')
call submode#leave_with('slurp', 'n', '', '<Esc>')
call submode#map('slurp', 'n', '', 's', ':<C-u>IcedSlurp<CR>')
call submode#map('slurp', 'n', '', 'b', ':<C-u>IcedBarf<CR>')" Change key mappings as you like.
" In this case, type `<LocalLeader>nnnn` to repeat jumping next errors.
call submode#enter_with('sign_jump', 'n', '', '<LocalLeader>n', ':<C-u>IcedJumpToNextError<CR>')
call submode#enter_with('sign_jump', 'n', '', '<LocalLeader>N', ':<C-u>IcedJumpToPrevError<CR>')
call submode#leave_with('sign_jump', 'n', '', '<Esc>')
call submode#map('sign_jump', 'n', '', 'n', ':<C-u>IcedJumpToNextSign<CR>')
call submode#map('sign_jump', 'n', '', 'N', ':<C-u>IcedJumpToPrevSign<CR>')22.2. Auto connection
It is recommended to define autocmd like follows in ftplugin directory.
aug MyClojureSetting
  au!
  au VimEnter * IcedConnect
aug END
If you don’t want to connect to REPL for project.clj, *.edn, or etc, skip connecting as below.
function! s:auto_connect() abort
  if expand('%:t') ==# 'project.clj' || expand('%:e') ==# 'edn'
    return
  endif
  IcedConnect
endfunction

aug MyClojureSetting
  au!
  au VimEnter * call s:auto_connect()
aug END
22.3. Overwriting mappings
vim-iced provides default key mappings. Since vim-iced will verify the mapping existence, if you would like to overwrite some key mappings, you could do as follows.
nmap <Leader>em <Plug>(iced_eval_at_mark) (1)
nmap <Leader>eM <Plug>(iced_macroexpand_1_outer_list) (2)
nmap <Nop>(iced_macroexpand_outer_list) <Plug>(iced_macroexpand_outer_list) (3)| 1 | Use <Leader>em for iced_eval_at_mark instead of <Leader>ea. |
| 2 | Use <Leader>eM for iced_macroexpand_1_outer_list instead of <Leader>em. |
| 3 | Disable default mapping <Leader>eM for iced_macroexpand_outer_list. |
22.4. Disabling paredit
By default vim-sexp's paredit mode is enabled. If you want to be able to add parentheses individually, you can disable that behavior by adding the following line to one of your startup files:
let g:sexp_enable_insert_mode_mappings=0If you also want to turn off other vim-sexp key mappings for clojure files (and scheme, lisp, and timl files), add the following line to one of your startup files instead of the preceding one:
let g:sexp_filetypes=''Then specify any vim-sexp key mappings that you want to keep by following the the instructions at :help sexp-explicit-mappings. Place the resulting code (including the augroup block) into a startup file.
22.5. Reloaded workflows
If you are managing lifecycle of components with Stuart Sierra’s component, integrant or etc, following configurations are useful.
22.5.1. CIDER way
vim-iced provides IcedRefresh command as same as the cider-ns-refresh feature. And it also support before/after hooks like follows.
let g:iced#nrepl#ns#refresh_before_fn = 'user/stop'
let g:iced#nrepl#ns#refresh_after_fn = 'user/start'
With this configuration, you can insert executions of functions before and after refreshing files when you execute IcedRefresh command.
22.5.2. Manual way
aug MyClojureSetting
  au!
  " Change key mappings and forms as you like
  au FileType clojure nnoremap <buffer> <Leader>go :<C-u>IcedEval (user/go)<CR>
  au FileType clojure nnoremap <buffer> <Leader>Go :<C-u>IcedEval (user/reset)<CR>
aug END23. External integration
23.1. kaocha
kaocha is full featured next gen Clojure test runner.
vim-iced has a external plugin named vim-iced-kaocha to integrate with kaocha.
| Command | Description |
|---|---|
:IcedKaochaTest |
Run tests specified by |
:IcedKaochaTestUnderCursor |
Run a test under cursor. |
:IcedKaochaTestNs |
Run tests in current namespace. |
:IcedKaochaTestAll |
Run all tests in current project. |
:IcedKaochaTestRedo |
Re run failed tests. |
:IcedKaochaTestRerunLast |
Run last test again. |
23.1.1. Usage
First, add vim-iced-kaocha to your vim-plug section.
call plug#begin('~/.vim/plugged')

Plug 'liquidz/vim-iced', {'for': 'clojure'}
" Add this line >>>>>>>>>>>>>>
Plug 'liquidz/vim-iced-kaocha'
" <<<<<<<<<<<<<<<<<<<<<<<<<<<<

call plug#end()
Next, launch your REPL with --with-kaocha option.
$ iced repl --with-kaochaaug MyClojureSetting
au!
" Change key mappings as you like.
au FileType clojure nmap <silent><buffer> <Leader>ktt <Plug>(iced_kaocha_test_under_cursor)
au FileType clojure nmap <silent><buffer> <Leader>ktn <Plug>(iced_kaocha_test_ns)
au FileType clojure nmap <silent><buffer> <Leader>ktr <Plug>(iced_kaocha_test_redo)
au FileType clojure nmap <silent><buffer> <Leader>ktl <Plug>(iced_kaocha_test_rerun_last)
aug END24. Socket REPL
vim-iced targets nREPL mainly, but now will also support minimal operations on socket REPL.
| Feature | Supports? | Description |
|---|---|---|
All ranges to evaluation are supported. |
||
Only referring docstrings. |
||
Etc… |
Any other features are not supported. |
vim-iced provides following commands to connect socket REPL.
| Command | Description |
|---|---|
Make connection to socket REPL. |
|
Make connection to pREPL. |
24.1. Connecting socket REPL
You can try socket REPL connection as follows.
| Tool | Command |
|---|---|
|
|
|
|
|
|
|
:IcedConnectSocketRepl 5555Another way, you can launch socket REPL with random empty port internally.
:IcedInstantConnect babashkaIf you’d like to use nREPL server instead of Socket REPL, you use g:iced#repl#babashka_repl_type option.
24.2. Connecting pREPL
pREPL connection is based on socket REPL connection in vim-iced.
|
borkdude/jet is required currently. |
You can try pREPL connection as follows.
$ clj -J-Dclojure.server.repl="{:port 5555 :accept clojure.core.server/io-prepl}":IcedConnectPrepl 555525. Developer
25.1. Minimal configuration
Minimal configuration is useful for debugging. If you find an unexpected behavior, please try this configuration.
$ mkdir -p /tmp/vim-iced-test/pack/iced/start
$ git clone https://github.com/guns/vim-sexp \
    /tmp/vim-iced-test/pack/iced/start/vim-sexp
$ git clone https://github.com/liquidz/vim-iced \
/tmp/vim-iced-test/pack/iced/start/vim-icedset nocompatible
set encoding=utf-8
scriptencoding utf-8
filetype plugin indent on
set runtimepath-=$HOME/.vim
set runtimepath-=$HOME/.vim/after
set runtimepath-=$HOME/.config/nvim
set runtimepath-=$HOME/.config/nvim/after
set runtimepath-=$HOME/.local/share/nvim/site
set runtimepath-=$HOME/.local/share/nvim/site/after
set packpath=/tmp/vim-iced-test# Vim
$ vim -u /path/to/test_config.vim /path/to/your/project/code.clj
# Neovim
$ nvim -u /path/to/test_config.vim /path/to/your/project/code.clj25.2. Testing vim-iced
vim-iced uses vim-themis as a test runner.
25.2.1. Run tests on docker
The easiest way to run tests is the way using docker.
# Run vimscript test for vim
$ make docker_themis

# Run vimscript test for neovim
$ make docker_neovim_themis
If you would like to filter test cases, use --target option for vim-themis.
Please refer to the argument of themis#suite in the first line of each test for the string to be specified for --target.
For example, execute the following command to run test cases only for iced#nrepl#eval.
$ docker run --rm -v $(pwd):/root \
      --entrypoint './.vim-themis/bin/themis' uochan/vim:latest \
      --target 'iced\.nrepl\.eval '
25.2.2. Run tests locally
You can also run tests locally.
The following make rule will clone vim-themis and run tests.
# Run vimscript test
$ make themis

# Run all tests
$ make test

# Once you clone vim-themis, you can specify `--target` like below
$ ./.vim-themis/bin/themis \
--target 'iced\.nrepl\.eval '26. Cheatsheet
|
Based on default key mappings. |
|
|
|||||||||||||||||||||||||
|
|
|
||||||||||||||||||||||||
|
Others
|